
3-POINT PERSPECTIVE | Welcome to the wacky-world of 3-point perspective! This is a very powerful and useful system for rendering certain 3-dimensional situations in a 2-dimensional medium! If you're starting here -- I recommend that you take a few minutes and go through the Perspective Primer on this site. It introduces you to some of the jargon and fundamental topics that are used here. Usually, when you design a shot that requires perspective, first consider if you are going to look directly into a vanishing point. Most often you will not, so now we are using at least 2 points. Consider for your shot if you can safely represent one of the 3 spatial dimensions as a set of parallel lines. If you can (when your eye level, or horizon line, is close to the level of your center of interest), then you are in a 2-point perspective application. When the center of interest moves away from the horizon line (eye-level), you should use 3-point perspective! Consider the following 3 examples.... and, oh yeah, before I forget..... Have fun!
|

| ||||||||||||||
Nightwing #31 Page 5A simple application of 3-point perspective. Here we want to look down on our boy Tad doing some one-arm push-ups. Note that we desire to have the viewer's eye level placed high, even a bit above the level of the panel! Our eye strays too far from the horizon line to force the verticals to remain parallel, thus we use 3-point perspective.
| 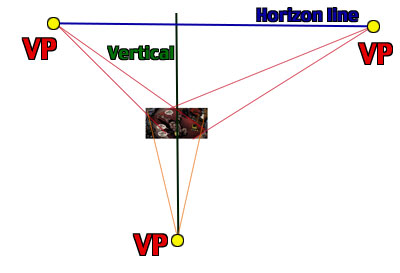
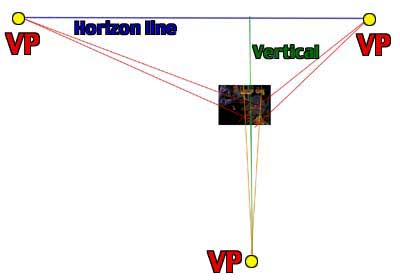
From experience, we know that rooms are rectilinear (that is, the walls and ceiling join together at right angles). We desire to show the floor at an oblique angle, to create a more interesting shot. | So - let's analyze this shot: First, find the eye level. This is your horizon line. We know that our vp's lie on this line. Next, find the vanishing point locations. Imaging the full form of the floor structures (that is, visualize it's complete, 3-D form in your mind). Neither face of the flooring is significantly more revealed than the other. Thus, we know that our center of interest is approximately mid-way between the VPs (not quite exactly tho). Set the two VPs. Last, determine the vertical (plum) line. If you were standing in the scene, and you held out a plum line, the vertical would be that line. See how it's perpendicular to the horizon line? That's it! Then we render the detail in accordance with the system we just constructed. Piece of cake!
| 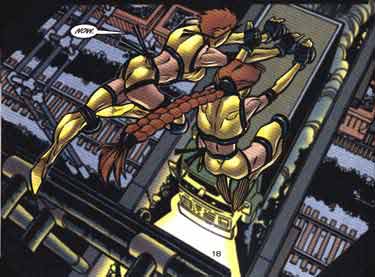
| Nightwing #32 Page 18A simple application of 3-point perspective. Note that we desire to look down at the leaping girls,, known as "Double-Dare." This communicates to the reader the danger they face in making this maneuver! Thus, the viewer's eye level (and our horizon) are well above the center of interest. We will indeed stray too far from the horizon line to keep the verticals perpendicular. We cannot force the verticals to remain parallel, thus we must use 3-point perspective.
| 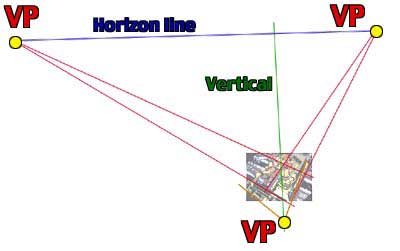
So - let's analyze this shot: | First, find the eye level. This is your horizon line. We know that our vp's lie on this line. Next, find the vanishing point location. Consider the intersection of the road and tracks beneath. We want them to be at right angles to each other -- so we can focus on the truck on the bridge to reveal the location of the VPs (the truck's length and width are in parallel to the bridge and track lengths). One face of the truck is significantly more revealed than the other. The face of the truck that is most revealed to us (the front) will have it's vanishing point farther away than the other face (the side). Thus, we know that the image is not centered between the two VPs. Set the two VPs. Last, determine the vertical (plum) line. If you were standing in the scene, and you held out a plum line, the vertical would be that line. See how it's perpendicular to the horizon line? That's it! Then we render the detail in accordance with the system we just constructed. Piece of cake!
| 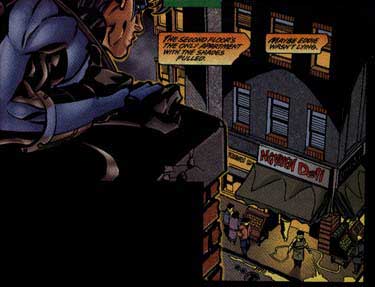
| Nightwing #33 Page 9A simple application of 3-point perspective. Note that we desire to look down at Nightwing and his target. We are trying to get right over his shoulder -- like we are there on the roof with him! Thus, the viewer's eye level (and our horizon) are a bit above the center of interest. We will indeed stray too far from the horizon line to keep the verticals perpendicular. We cannot force the verticals to remain parallel, thus we must use 3-point perspective.
| 
From experience, we know that buildings are rectilinear (that is, the walls and ceiling join together at right angles). We desire to show the buildings from an oblique angle, revealing a more interesting shot. | So - let's analyze this shot: First, find the eye level. This is your horizon line. We know that our vp's lie on this line. Next, find the vanishing point locations. Note that the front face of the building is more revealed to us than it's side face. Thus, we know that the VP for the front face will be farther away from the center of interest than the other VP. Set the vanishing points. Next, determine the vertical (plum) line. If you were standing in the scene, and you held out a plum line, the vertical would be that line. See how it's perpendicular to the horizon line? That's it! Then we render the detail in accordance with the system we just constructed. Piece of cake!
| Summary!Three-point perspective is very useful in situations where the viewer is looking at a subject at an oblique angle, with the center of interest being far off the horizon line.Where do we go from here? Well, the next sophisticated system of perspective is curvilinear perspective! This system employs 5 vanishing points, transforming straight lines into arcs to achieve a more realistic representation of reality. |